Concrete Tools Explained: What You Need to Pour and Finish a Slab
Updated: Jul 29
Pouring concrete takes more than just calling your local ready-mix plant, ordering a truckload of mud, and dumping it on the ground. To create a flat, properly drained, and professional-looking slab, you need the right concrete tools, and you need to use them in the right order.
There are hundreds of specialized tools available to concrete contractors, but beginners do not need every tool on the market. For a basic exterior slab, such as a patio, sidewalk, or driveway section, a relatively small collection of tools can handle most of the pouring and finishing. In this guide, we explain the basic concrete tools used to place, level, float, edge, joint, and finish an exterior concrete slab.
What Tools Do You Need to Pour Concrete?
The basic tools needed to pour and finish an exterior concrete slab include:
The exact tools needed will depend on the size of the slab, the surrounding structures, and the type of finish being installed. Larger placements may require powered equipment, while smaller slabs can often be completed with traditional hand tools.
1. Concrete Boots
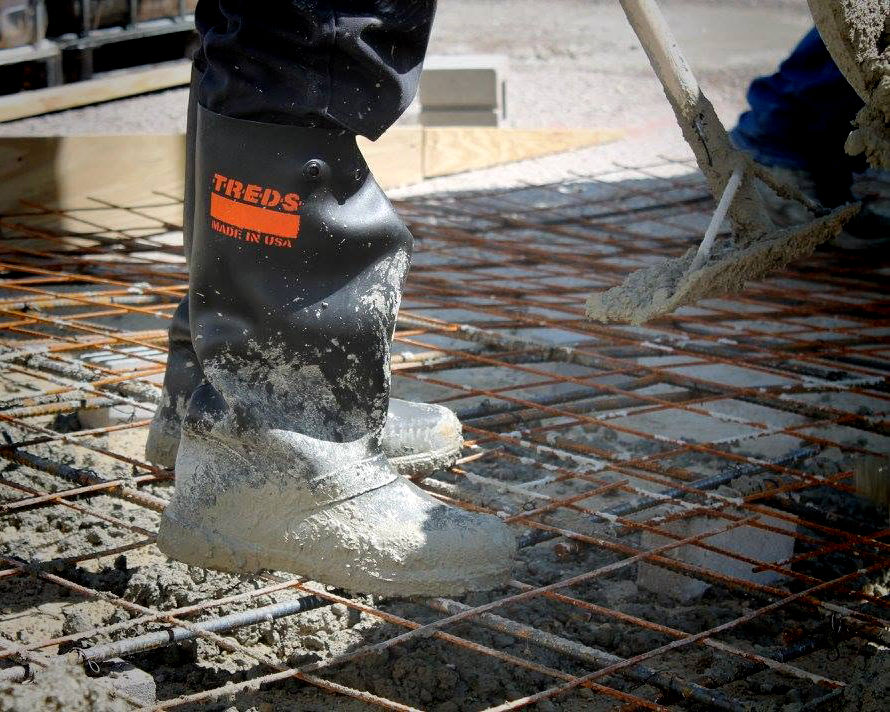
Even on a relatively small slab, workers will need to step into the wet concrete to place and spread it. A waterproof barrier helps keep concrete away from your shoes, feet, and lower legs. Slip-over concrete boots are designed to fit over standard work boots and can be removed once the placement is complete. Rubber muck-style boots are another popular option.
Waterproof lace-up work boots should not be treated as concrete boots. Wet concrete can work its way into seams, around the laces, and over the top of the boot. Dedicated concrete boots provide much better protection and are easier to clean after the pour.
2. Tool Brush or Scrub Brush
A stiff tool brush may not be the most exciting item in the trailer, but it is one of the most important. Concrete residue should be removed from tools immediately after each placement. Spraying the tools with water is a good start, but a brush helps remove material that sticks around bolts, brackets, handles, and edges.
Allowing concrete to harden on your tools creates buildup that can interfere with their performance. It can also damage working edges, making the tools heavier and more difficult to use. A concrete job is not finished until the tools are clean.
3. Wheelbarrow
A wheelbarrow can perform several jobs before, during, and after a concrete placement.
It may be used to:
Move gravel or soil
Transport tools from the trailer
Carry concrete into areas the truck cannot reach
Hold water for washing tools
Collect debris during cleanup

Even when the concrete truck can reach the entire slab, having a wheelbarrow filled with clean water gives the crew a convenient place to rinse hand tools before concrete begins to harden.
Choose a heavy-duty wheelbarrow that can handle the weight of wet concrete. Concrete is extremely heavy, and a light-duty landscaping wheelbarrow may not withstand repeated use.
4. Concrete Rake, Come-Along or Placer

A concrete rake is normally one of the first tools used when concrete begins coming out of the truck. Depending on the contractor or region, this tool may also be called a:
Come-along
Concrete placer
Concrete rake
Placing rake
Regardless of the name, its purpose is to move and roughly position the wet concrete before screeding. The rake can pull concrete into low areas, push material toward edges, and help distribute the concrete throughout the forms. Its angled blade also allows workers to puddle concrete along forms and around embedded objects.
A concrete rake can also be useful before the pour to spread and level the gravel subbase. The goal at this stage is not to create a finished surface. The rake simply gets the concrete close to the proper elevation so the screed can perform the final strike-off.
5. Concrete Screed
Once the concrete has been roughly placed, it must be struck off with a screed.
A screed is a straight tool that rides along the forms or screed rails to remove high areas and fill low areas. It establishes the slab's initial plane and helps create the proper slope or level.

You may also hear screeds called:
Screed board
Screed rod
Straightedge
Strike-off rod
For exterior concrete, the screed helps establish the slope needed to direct water away from buildings and prevent standing water. Hand screeds are available in several lengths, profiles, and handle configurations. Some are operated by a single person, while longer screeds require workers at both ends. Powered vibrating screeds and laser screeds may be used on larger commercial placements.
For a small, one-time DIY project, a straight, rigid 2x4 may serve as a basic screed. Anyone planning to pour concrete regularly should invest in a professional concrete screed. A purpose-built screed is lighter, stays straight, and is easier to control.
6. Bull Float
After screeding, the next major step is floating the surface. A bull float is a large float attached to extension handles. It allows the finisher to reach across the slab without stepping onto the freshly screeded concrete.

Bull floating helps:
Smooth ridges left by the screed
Fill small voids
Embed larger aggregate slightly below the surface
Remove minor imperfections
Prepare the slab for later finishing
Bull floats are commonly made from magnesium, aluminum, resin, wood, or composite materials. Magnesium bull floats are among the most common choices for general concrete finishing. Resin and wood-style floats can also be useful, especially when working with decorative or stamped concrete. Bull floats are available with square or rounded ends and in several lengths. A four-foot bull float is a common size for general residential and light-commercial work.
Bull Float Leveler Bracket

The bull float should be attached to a leveler bracket that allows the blade angle to change as it travels across the concrete. The leading edge should be slightly raised so it does not dig into the slab. When the direction changes, the float angle must change with it. Chain-driven, gear-driven, and twist-style levelers are available. Regardless of the design, the key feature is the ability to adjust the float's pitch while working from the edge of the slab.
7. Bull Float Handles

Bull float handles connect the finisher to the float, allowing it to travel across the slab. The handles are typically manufactured in sections. Additional sections can be connected when more reach is needed. Handle length depends on the slab width. A small sidewalk may require only one or two sections, while a wider patio or driveway may require several.
Many other concrete finishing tools can also be connected to bull float handles, including finishing brooms, walking edgers and groovers. Using compatible handles and adapters can reduce the amount of equipment that needs to be carried to the jobsite.
8. Magnesium Hand Float
A hand float is used to work areas that the bull float cannot finish accurately, especially around forms, drains, steps and other edges. Magnesium hand floats are so common that many concrete finishers simply call them “mags.”
The mag float can be used to:
Smooth concrete along the forms
Flatten areas around drains and penetrations
Remove small ridges and imperfections
Prepare the surface before edging
Touch up the slab as it begins to set
Hand floats are available in different lengths, widths, and end shapes. Some have square ends, while others have rounded or partially rounded ends. Handle material is largely a matter of preference. Traditional wood handles remain popular, but many finishers prefer rubber or cushioned handles for additional comfort and grip. A mag float is one of the tools a concrete finisher will keep nearby throughout most of the placement.
9. Concrete Edger
A concrete edger creates a smooth, rounded edge where the slab meets the forms, an existing slab, or another structure. Without edging, the concrete perimeter can remain sharp, irregular, and more vulnerable to chipping.

Edgers are available in various sizes, widths, and radii. A standard 6-inch-by-6-inch edger is suitable for many basic slabs. Common edge radii include 3/8 inch and 1/2 inch.
The edger is normally used more than once. The first pass establishes the edge after the concrete has been placed and floated. Additional passes are made as the concrete firms up. The final pass cleans and defines the edge before the finishing texture is applied.
Trying to edge the slab only once and then immediately broom it will usually leave rough marks and an unfinished appearance. Floating and edging are repeated as the concrete progresses through the finishing process.
10. Concrete Knee Boards
Some slabs can be reached completely from the surrounding forms. Others have areas that are too far from the edge to finish.
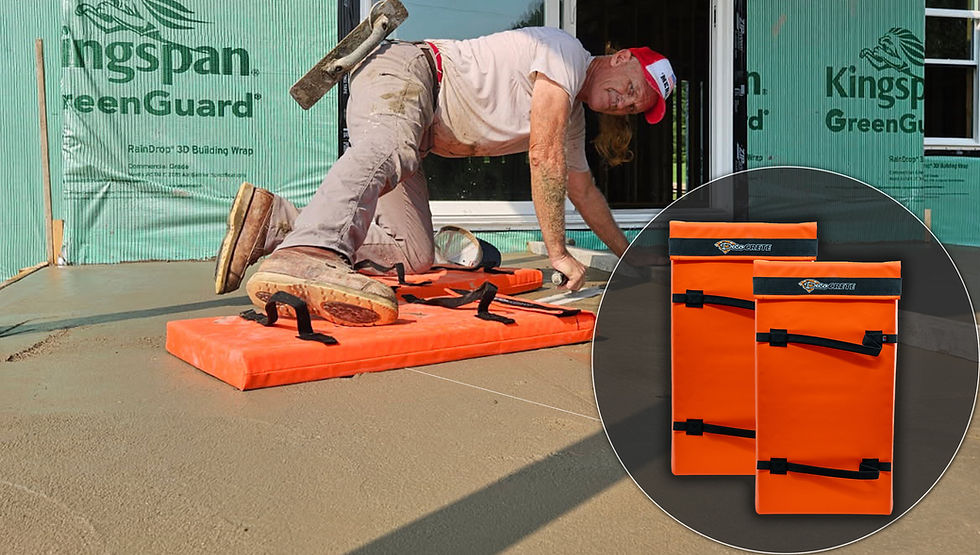
This most commonly happens when concrete is poured:
Against a house
Next to a building
Between existing structures
In a large or unusually shaped area
With an edge that cannot be reached from outside the forms
Concrete knee boards distribute the finisher’s weight across a larger surface so they can move onto the slab without sinking deeply into the concrete. Basic knee boards are available, but contractors who regularly finish concrete may benefit from investing in a more comfortable and durable set. Quality kneeboards can reduce fatigue, provide additional stability, and make it easier to reach difficult areas. Knee boards are also necessary for finishes that must be completed by hand across the entire slab, such as a hand-swirl finish.
11. Concrete Groover
Concrete naturally shrinks as it cures. Control joints are intentionally placed in the slab to encourage cracking to occur along planned lines rather than randomly across the surface. Control joints can be created with a concrete groover while the concrete is still workable or installed later with a concrete saw.
A walking groover attaches to a bull float handle, allowing the joint to be placed from outside the slab. A hand groover is then used to refine the joint and finish the areas near the edges. The location, spacing, and depth of control joints should be planned before the placement begins. Some projects may require tool joints, while others can be saw-cut after the concrete has hardened enough to support the saw without damaging the surface. Not every slab will require a groover, but it is an essential tool when tooled control joints are part of the finishing plan.
12. Concrete Finishing Broom
A broom finish is one of the most common textures used on exterior concrete. After the concrete has been floated, edged, and allowed to firm up, a finishing broom is pulled across the surface. The bristles create a uniform texture that improves traction and gives the slab a consistent finished appearance.

Concrete finishing brooms are available with different:
Bristle materials
Bristle stiffnesses (for different textures)
Widths
Handle brackets
A standard green-bristle concrete broom works well for many patios, sidewalks, and other exterior slabs. The broom can be attached directly to a handle, but an adjustable-angle bracket provides more control. Adjusting the broom angle helps the bristles make consistent contact with the surface without digging too deeply or skipping across the concrete.
The timing of the broom finish is extremely important. Brooming too early can tear the surface and create heavy ridges. Waiting too long can make it difficult to create a consistent texture.
Optional Finish: Hand-Swirled Concrete
Not every exterior slab receives a broom finish. A hand-swirl finish is a more traditional option created with hand floats. The finisher works from kneeboards and uses overlapping circular movements to create the texture.

This finish does not require a concrete broom, but it does require several hand floats, kneeboards, and sufficient finishing experience to maintain a consistent pattern across the slab. Although hand-swirl finishes are less common than they once were, they are still used in certain regions and on projects where a more handcrafted appearance is desired.
The Basic Concrete Pouring and Finishing Process
The tools discussed above are generally used in the following order:
Place and roughly distribute the concrete with a rake or come-along.
Strike off the surface with a screed.
Float the main area with a bull float.
Work around forms and obstacles with a magnesium hand float.
Create the first pass around the perimeter with an edger.
Install tooled control joints with a groover when required.
Allow the concrete to firm up.
Float and edge the slab again as needed.
Apply the final broom or hand-swirl texture.
Clean every tool before the concrete hardens.
Concrete finishing is generally not completed in a single pass. The slab must be monitored as it sets, and several tools will be used repeatedly. Temperature, wind, sunlight, humidity, concrete mix design, and slab thickness can all influence how quickly the concrete becomes ready for each finishing step.
Do You Need Professional Concrete Tools?
A homeowner completing one small project may be able to rent tools or use basic alternatives. A straight 2x4, for example, may work as a screed when it is truly straight and the slab is small. However, professional concrete tools are a worthwhile investment for anyone planning to complete multiple projects.
Quality tools generally provide:
Straighter working edges
Better balance and control
More comfortable handles
Easier cleaning
Longer service life
More consistent finishes
The most expensive tool is not always the best fit for every contractor. Handle design, tool weight, blade shape, and material can all affect comfort, control, and performance depending on the type of concrete work being completed. Before investing hundreds or even thousands of dollars, take time to compare different options and choose tools that feel balanced, comfortable, and easy to control.
Keeping Your Concrete Tools Clean

Concrete tools can last for years when they are properly maintained. Keep a water source, a wheelbarrow, and a stiff-bristled brush available at every placement. Do not wait until the end of the day to begin cleaning. Concrete residue becomes increasingly difficult to remove as it hardens.
Pay close attention to:
Edges and corners
Handle brackets
Adjustment mechanisms
Bolts and fasteners
Threaded connections
Float levelers
Clean tools perform better, create cleaner finishes, and are easier to use on the next job.
Frequently Asked Questions About Concrete Tools
What tools are needed to pour a concrete slab?
The basic tools include concrete boots, a wheelbarrow, a concrete rake, a screed, a bull float, extension handles, a magnesium hand float, an edger, and a finishing broom. Kneeboards and groovers may also be needed depending on the slab design.
What tool is used to spread wet concrete?
A concrete rake, come-along, or concrete placer is used to push and pull wet concrete into position before screeding.
What is the difference between a screed and a bull float?
A screed strikes off the concrete and establishes the initial elevation, slope, or level of the slab. A bull float is used afterward to smooth screed marks and prepare the surface for additional finishing.
What is a mag float used for?
A magnesium hand float, commonly called a mag, is used to smooth and flatten concrete around forms, drains, penetrations, and other areas that cannot be properly finished with a bull float.
Can a 2x4 be used as a concrete screed?
A straight 2x4 can be used as a basic screed for a small or one-time project. Professional aluminum or magnesium screeds are usually lighter, straighter, and easier to control.
Why do concrete finishers edge a slab?
Edging rounds and compacts the slab perimeter. This improves its appearance and helps reduce sharp, fragile edges that may chip.
Is a concrete groover always required?
No. A groover is used when installing control joints while the concrete is still workable. Some slabs are finished without tool joints and saw-cut later.
What is the most common finish for exterior concrete?
A broom finish is one of the most common choices for exterior concrete because it creates a uniform texture and improves traction.
Start With the Right Concrete Tools
You do not need every specialty tool available to pour a basic exterior slab. Start with the essential tools needed to place, screed, float, edge, joint, and texture the concrete.
As your projects become larger or more complex, you can add specialty floats, powered screeds, walking tools and other equipment to your collection.
The right concrete tools will not replace proper technique, but they can make the placement easier, improve the finished surface and help produce more consistent results.