How To Transform Your Concrete with Hand-Textured Woodgrain Overlays
- Dec 26, 2025
- 3 min read
Updated: Jan 6
Why Choose a Hand-Textured Woodgrain Overlay?
This technique has been around for quite some time. However, it has evolved significantly thanks to contractors pushing creative boundaries. While photos online can look intimidating, the reality is that this system is very approachable, even for first-timers.
Benefits of Hand-Textured Woodgrain Overlays
No stamping mats required: You can achieve beautiful textures without the need for expensive mats.
Minimal tools and materials: The process requires only basic tools, making it accessible.
Affordable practice and mockups: You can practice without breaking the bank.
Fully custom textures, board sizes, and colors: Tailor the design to your liking.
Works for interior and protected exterior spaces: Versatile for various applications.
You can practice on drywall or cement board before ever touching a customer’s floor.
Project Overview
Difficulty Level: 4/5
Application Method: Hand Trowel Texture
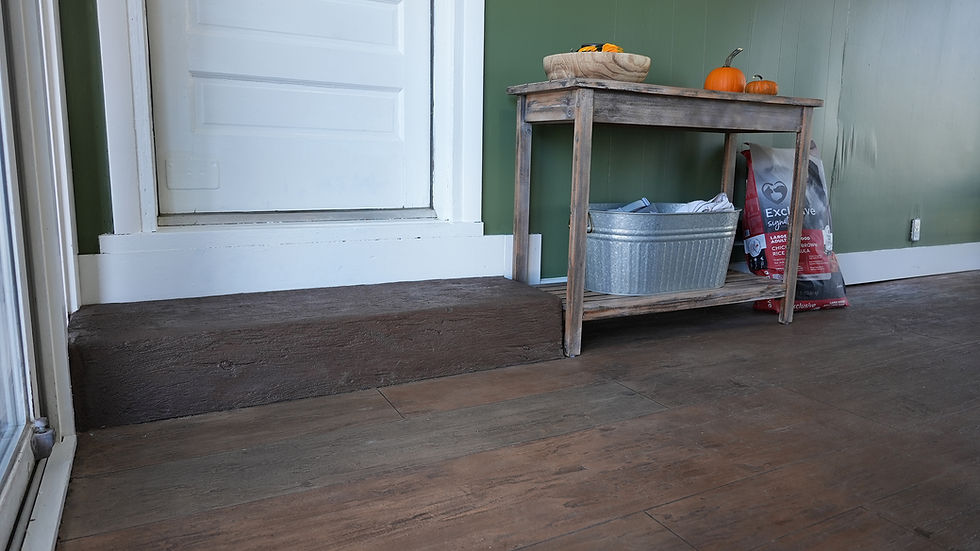
Look Achieved: Wood Plank Floor With Natural Grain Variation
Materials & Tools Used
Products Used:
Micro-Topping Base Coat (White)
Trowel Overlay Mix Texture Coat (Gray)
Primer (applied between all layers)
Integral Pigment Base Coat (Dark Gray)
Integral Pigment Texture Coat (Barnstone)
Water-Based WB Stains (Sandal Wood, Arctic Gray, and Mohican Leather)
Texture Enhancer for Antiquing (Chocolate or Black)
Tools
Pool Trowels (Round-End Trowel)
Grout Tape (8")
Spike Shoes
Mixing Buckets (8-Gallon Preferred)
Heavy-Duty Drill & Paddle Mixer
Chip Brushes
Pump Sprayer
Steel Trowel or Putty Knife
Carbide Scraper or Screwdriver for Joints
Scotch-Brite Pads or Sanding Pads
Shop Vacuum & Leaf Blower
Step 1: Surface Preparation
The concrete must be:
Clean
Mechanically profiled (ground or shot-blasted) - see datasheet for more information
Repaired (cracks filled, patches cured)
After Prep Steps
Vacuum thoroughly.
Apply primer (mixed 1:1 with water) using a pump sprayer.
Back-roll with a ⅜" nap roller.
Allow to dry.
Tip: Even on diamond-ground concrete, always prime between overlay coats.
Step 2: Apply the Base Coat (Micro-Topping)
The base coat provides:
A smooth foundation.
A dark background color between “planks.”
Mixing Instructions
Use 5–6 quarts of water per bag.
Aim for a consistency similar to thick latex paint.
Let the mix false set for 3–5 minutes, then remix.
Application Steps
Wear spike shoes.
Trowel evenly across the surface using a magic trowel.
Minor trowel marks are fine; they’ll be addressed later.
Allow to dry thoroughly (same day or overnight, depending on conditions).
Step 3: Light Scrape & Layout the Wood Planks
Once dry:
Lightly scrape or sand to remove high spots.
Board Layout Tips
Vary board widths (6", 8", 10", 12").
Vary board lengths for realism.
Use soapstone or chalk for layout.
Apply grout tape for plank seams.
After Applying Tape
Apply another coat of primer.
Let dry completely to lock the tape in place.
Step 4: Apply the Woodgrain Texture Coat
This is where the magic happens.
Material
Trowel Mix / Texture Overlay
Tools
Pool Trowels & Spike Shoes
Key Techniques
Spread material evenly over taped sections.
Run the trowel in the direction of the grain.
Keep the trowel flat to create suction.
Drag slowly to pull the woodgrain texture into the surface.
You can also experiment with:
Brushes
Brooms
Custom Texture Tools
Texture Rollers
Allow the overlay to dry completely before removing the tape.
Step 5: Pull Tape & Refine Joints
The reveal is one of the most satisfying steps.
Carefully remove grout tape.
Clean seams using Carbide Scraper or Flat Screwdriver
Knock down any sharp edges or raised texture as needed with a steel trowel or putty knife.
Step 6: Staining the Wood Planks
This project used our Water-Based WB Stains for subtle, natural tones.
Color Strategy
Use 2–3 complementary colors.
Slightly vary the tones board-to-board.
Avoid overly “painted” looks by keeping your stains translucent and applying them thinly.
Application Tips
Apply with chip brushes.
Keep a spray bottle of clean water nearby to soften or erase color.
Work in layers and let tones blend naturally.
Step 7: Distress (Optional)
To enhance realistic textures:
Lightly scrub high spots with Scotch-Brite.
Blow off dust.
Step 8: Antiquing
The two most common colors used are Chocolate and Black. See datasheet for the full application instructions. Apply evenly and wipe back to highlight grain, seams, and low spots.
Step 9: Seal the Floor
Finish with D-One Sealer to:
Lock in color.
Add durability.
Protect against wear and moisture.
Apply per the manufacturer's instructions and allow sufficient curing time before traffic.
Final Thoughts
A hand-textured woodgrain concrete overlay proves that you don’t need stamps, expensive tools, or massive budgets to create high-impact decorative concrete. With patience, creativity, and practice boards, you can develop your own signature wood textures and layouts. This technique is all about feel, experimentation, and letting the material work for you. If you’re looking to advance your decorative concrete skills, this is one of the most rewarding techniques to master.
Want to learn more techniques like this? Explore training resources and product details from Deco-Crete and keep experimenting. The best floors start with curiosity and a trowel.
